Most of the 3G USB modems from service providers like Airtel, Idea, Tata Docomo, Vodafone, Reliance, etc. either do not have instructions to connect the modem on Linux platform or the instructions are too complicated to follow.
Here is an easy to follow procedure, to connect the dongle (USB modem) using terminal on linux.I tried this procedure with Reliance Netconnect+, Tata Docomo Photon+ and Idea Netsetter. The dongles were manufactured by Huawei and ZTE . This method also works with Vodafone Netcruise, Airtel 4G LTE and others, as the dongles provided are manufactured by Huawei and ZTE.
Before starting the procedure get the default Username, Password and Dial phone number as per your service provider.
For Reliance Netconnect+:
Username: <10 digit number provided to you>
password: <10 digit number provided to you.>
Phone: #777
For Tata Docomo Photon+:
Username: internet
password: internet
Phone: #777
For Idea Netsetter:
Username: idea
password: idea
Phone: *99#
Once you have the above details you are ready to start the procedure.
NOTE: The steps below are performed on Ubuntu, a distribution of Linux provided by Canonical.
STEP 1: Start Terminal (Applications->accessories->Terminal).
STEP 2: Plugin your USB modem and enter command: $ sudo dmesg -c
you'll get the following output:
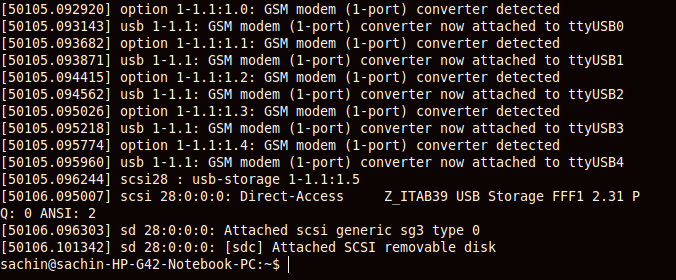 |
| Note: The output has been cropped |
The output shows that a GSM modem has been detected on USB port ttyUSB0. You can get additional information of the device using "lsusb" command.
STEP 3: Enter command: $ sudo wvdialconf
you'll get the following output:

The output shows that the modem has been detected. The modem configuration is also written to a file /etc/wvdial.conf. But still information about username, password and phone is not inserted. We'll have to insert this information manually.
NOTE: If wvdialconf is not installed. Use command: $ sudo apt-get install wvdialconf
STEP 4: Enter the command: $ sudo gedit /etc/wvdial.conf
Remove the semicolon before the last three lines and insert appropriate Phone, Password, Username.
The file is displayed as follows:
 |
| Note: This output is for Tata Docomo Photon+ |
STEP 5: Enter the command: $ sudo wvdial
The following output is displayed:

The output displays your IP address and DNS address. By now the wireless internet connection is established. Minimize the terminal and enjoy browsing.
NOTE: If wvdial is not installed. Use command: $ sudo apt-get install wvdial